Manage Administrative Access
The third tab of your Settings Panel is the Administrators Tab. Here, you can invite people to your team and manage their permissions. Let's see how this is done!
Add a new administrator
To invite a new admin to gain access to your church's Control Center, click the Add New + button.
At this point, type in the email address for the admin you wish to invite. You can also set their level of permission by selecting an option from the dropdown menu to the right of the email address. (By default, this will be set to the lowest level.) 
Once you're satisfied with the information shown, click the Invite New Admin button.
Once you invite someone to your team, they will receive an email (as shown below) from RebelGive. This person will need to accept the invite by clicking the Get Started button.
As soon as they do this, they will be taken to your church's RebelGive Control Center. If they don't already have a RebelGive account, they'll need to follow the steps on the screen to create one before they can gain access to your Control Center. This will be the login credentials they will use to login to gain access to both their personal RebelGive account and your church's Control Center.  If, while adding an admin, you change your mind, click the X button beside the Invite New Admin button to cancel.
Once an admin has accepted the invitation, it will no longer say Revoke Invite under the Status column, rather it will simply say Deactivate. Additionally, the (Invite Sent) under the Name column will be replaced with the admin's name. If they haven't added this in their personal account, this field will remain blank.
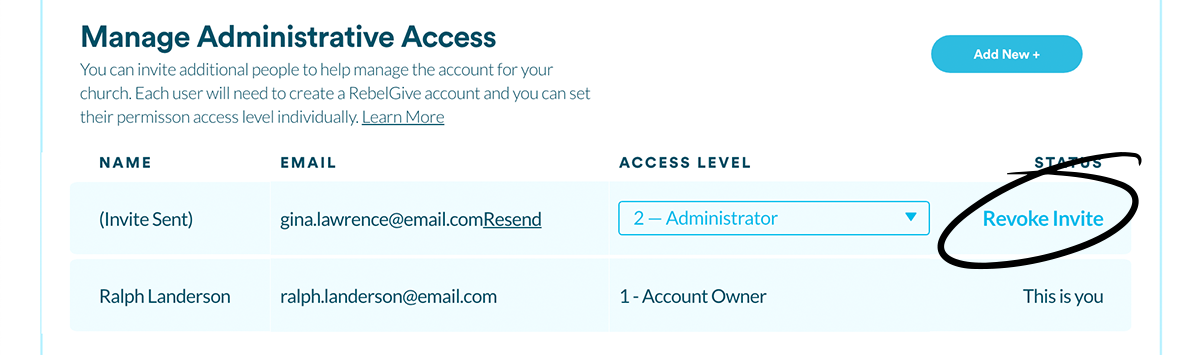
Revoke invite
Accidentally send the invite to an incorrect email address? Suddenly change your mind? If the person you've sent the invite to hasn't accepted, you can always revoke the invite. Simply click the Revoke Invite button. This will render the invite email sent useless.
Change an administrator's permissions

You can always change a user's permissions at any time. Simply click on their current permission and select a new one from the dropdown menu. 
RebelGive offers five levels of access permission. Here are the descriptions of the types of permissions for each level:
1 — Account Owner: Full and complete access and control
2 — Administrator: Access to everything
3 — Pastoral Admin: Full admin, but personal giver data hidden (this level cannot add manual transactions)
4 — Financial Assistant: Access to transactions, givers, and funds only
5 — Reporting: Access to transactions & givers only (this level cannot add manual transactions)
Change Account Owner
Though we recommend the Account Owner be someone who will likely be a part of your church body for a significant amount of time, it may be necessary to switch Account Owners. To do this, simply contact our Customer Success team by emailing hello@rebelgive.com. To complete the process, a few of things need to take place:
- We'll send the current Account Owner an email with a DocuSign to sign, stating that they relinquish their position of Account Owner.
- They'll then pass the DocuSign over to the new Account Owner, who will sign it, stating they will take on that position.
- We'll receive the DocuSign back and pass it onto CardConnect (our card processor). They will then adjust the details on your merchant account.
- Our team will then adjust the Account Owner in your Control Center.
Deactivate an administrator
If someone decides to leave your admin team for whatever reason, you can always revoke their access. Simply click the Deactivate button under the Status column. While they will still be able to use their login to access their personal RebelGive account, they will no longer be able to access your church's side of the Control Center.
Reactivate an administrator
Should you need to reactivate an old administrator, you can easily do this! When you deactivate an admin, they don't disappear from your list to allow you to easily reactivate their access to your church's Control Center. Simply click the Reactivate button under the Status column and they will be able to login and access your church's information as they did before.